Perpendiculars
Two lines (or rays or segments) are perpendicular if they intersect in such a way that the angles formed between them are right angles (90°).

In the given figure, the lines l and m are perpendicular to each other.
You can find perpendicular lines in many everyday objects. Here are five examples:
The corners of a notebook or a piece of paper
The edges of a table or a book
A window frame
Perpendicular Line Through a Given Point
Activity: Using Paper Folding
We can draw a perpendicular line using a simple folding technique:

1. Draw a Line:
- Take a sheet of tracing paper and draw a straight line (l).
2. Mark a Point:
- Choose a point P on this line where you want to construct the perpendicular.
3. Fold the Paper:
- Fold the paper at P in such a way that both halves of the line l overlap exactly.
4. Unfold to Reveal the Perpendicular:
- When you unfold the paper, the crease formed by the fold will be perpendicular to line l at point P.
Steps of Construction
1. Draw the Line Segment:
- Start by drawing a straight line segment AB.
2. Set the Compass Radius:
- Adjust the compass to a radius slightly more than half the length of AB.
3. Draw Arcs from Point A:
- Place the compass pointer at A and draw two arcs—one above and one below the line segment.
4. Draw Arcs from Point B:
Without changing the compass radius, place the pointer at B and draw two more arcs.
These arcs should intersect the previous arcs at two points—M (above AB) and N (below AB).
5. Draw the Perpendicular Bisector:
Use a ruler to join M and N with a straight line.
This line perpendicularly bisects AB at point P, meaning it divides AB into two equal parts at a 90° angle.
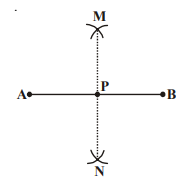
Now, line l is the required perpendicular bisector of AB, and P is its midpoint!
Steps of Construction
1. Draw the Given Line and Point:
Draw a straight line l.
Mark a point A somewhere above or below the line (not on it).
2. Draw an Arc from Point A:
Place the compass pointer at A and draw an arc that cuts the line l at two points.
Label these points as M and N.
3. Construct Intersecting Arcs Below the Line:
Keep the same compass radius and place the pointer at M.
Draw an arc below the line.
Without changing the radius, place the pointer at N and draw another arc that intersects the first arc.
Label this intersection point as B.
4. Draw the Perpendicular Line:
Use a ruler to join points A and B with a straight line.
This line AB is the perpendicular to l from A.
Now, you've successfully drawn a perpendicular to l from a point not on the line!